Introduction 
The Internet has increasingly become bloated with ads and trackers that slow down your browsing and violate your privacy. I’ve often seen up to 30% of my home network DNS queries be to ad and tracking domains. Ad blockers are becoming quite common on web browsers, but what about devices that don’t support those extensions like smart TVs? Pi-hole is a DNS-level ad and tracker blocker that works on all your devices in your whole home network with nothing else to install or change on them.
While there a are a fair number of tutorials for installing Pi-hole on the internet already, including the official documentation, I personally had some trouble getting it working in Docker with IPv6 enabled, so I wanted to document how I got it working. I’ll also cover adding additional blocklists, unblocking some domains that may be necessary for popular services you use, and extra privacy with DNS over HTTPS.
Don’t want to use IPv6 or Docker?
It’s okay if you don’t have an IPv6 enabled network (or don’t want to set it up), these instructions will also work great for a plain IPv4 setup – just skip the IPv6 steps! Same goes for Docker, I’ve included instructions for setting it up with or without.
Choosing a Device 
I’ll be running Pi-hole on a Raspberry Pi 4 with Raspberry Pi OS (formerly Raspbian), but it also works well on other models and most other devices running Linux or that have Docker available. That being said, some low-end devices can get slow if you add a lot of blocklists. I was previously running Pi-hole on a Raspberry Pi Zero and with 700k domains blocked it would often take 5-10 minutes to unblock a domain.
This tutorial assumes you already have a device setup with either direct terminal access or SSH access. Unless otherwise specified, all of the commands should be run in the terminal or over SSH. Check out the official getting started tutorial for the Raspberry Pi to get your device setup if you haven’t yet!
Setting a Static IP Address 
Since all of your devices will use Pi-hole as their DNS server, it’s important whatever device you run it on has a static IP address set so you never have to update it in the future.
What Should I use for a Static IPv4 Address? 
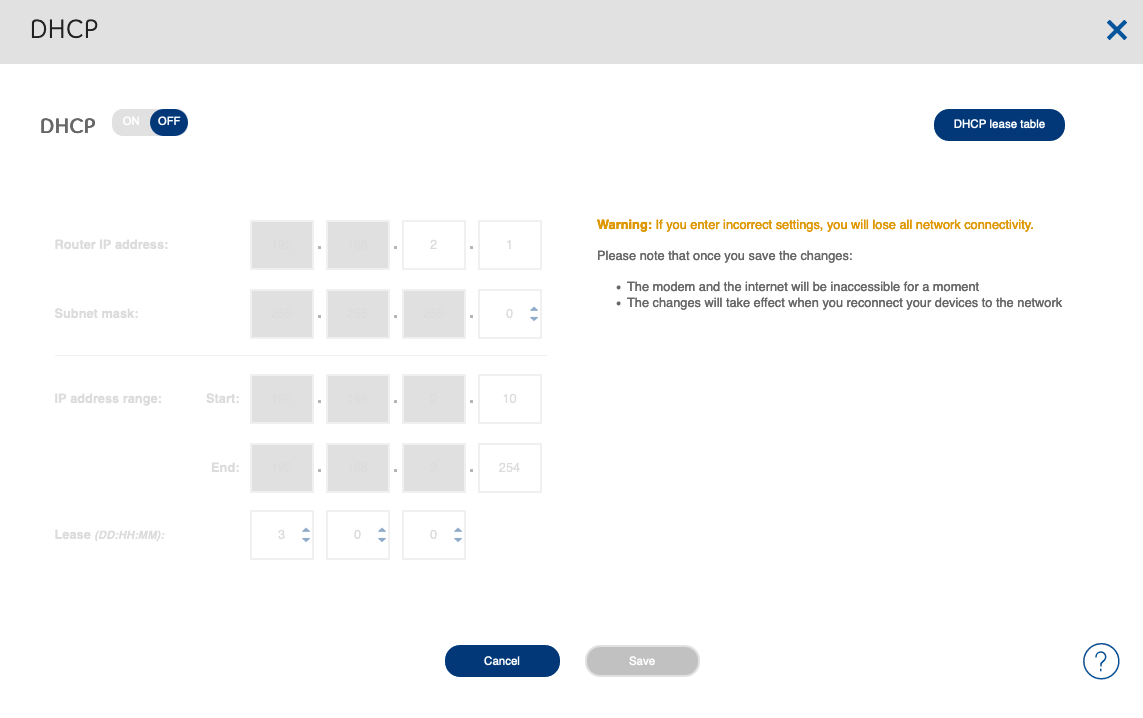
If you’re not sure what to use as your static IPv4 address, it would be good to know the DHCP range your router uses to assign addresses which can usually be found in your router settings.
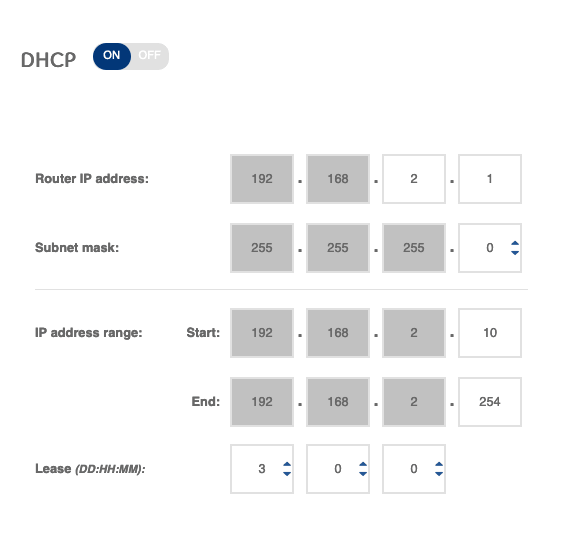
Since my router uses the range 192.168.2.10-192.168.2.254, I’m going to choose an IP within the same subnet (192.168.2.x) but outside of that range so there’s no chance of any other device getting assigned the same address. I’ll pick 192.168.2.5 in my case.
If you can’t find the DHCP range in your router, you should usually be fine to choose an IP within your subnet. To find your subnet, you can run ip addr to see your current local IP and replace the last segment with the digits of your choice. Here’s the relevant output on my device (you’re likely looking for either the eth0 or wlan0 section):
2: eth0: <BROADCAST,MULTICAST,UP,LOWER_UP> mtu 1500 qdisc mq state UP group default qlen 1000
    inet 192.168.2.58/24 brd 192.168.2.255 scope global noprefixroute eth0
       valid_lft forever preferred_lft forever
We can see that my IPv4 address is 192.168.2.58 so I’ll replace the 58 with whatever I’d like, again I’ll be using 192.168.2.5.
What Should I use for a Static IPv6 Address? 
Similarly to IPv4, we can use the ip addr command to see our existing IPv6 address(es) and decide based on that. There should be one that starts with fd00:, this is your Unique local address (ULA) that will be reachable on your private network. Depending on the device this may be static already, but some devices change them regularly for privacy reasons so we’ll make sure it’s static in the next step. Here’s the relevant output on my device showing my ULA:
2: eth0: <BROADCAST,MULTICAST,UP,LOWER_UP> mtu 1500 qdisc mq state UP group default qlen 1000
    inet6 fd00:9050:df0c:f182:9ec4:ae37:1a0b:281b/128 scope link
       valid_lft forever preferred_lft forever
Configuring Static IPs in the dhcpcd Config 
Now that we know what to use for the static IPs, we can configure them on the device. For Raspberry Pi OS (and likely many other Linux distributions), this is as easy as editing the /etc/dhcpcd.conf file. The easiest way to do this is sudo nano /etc/dhcpcd.conf.
Then, find the section with the static IP configuration example, uncomment it by removing the # at the start of each line, and fill in the values you determined. Make sure you enter the same network interface name from ip addr (likely either eth0 or wlan0). You’ll also want to choose an upstream DNS service which Pi-hole will fetch from, I’ll be using Cloudflare’s 1.1.1.1. Here’s my configuration:
interface eth0
static ip_address=192.168.2.5/24
# Skip this line if you don't want IPv6 support
static ip6_address=fd00:9050:df0c:f182:9ec4:ae37:1a0b:281b/128
static routers=192.168.2.1
# Remove the last 2 IPs if you don't want IPv6 support
static domain_name_servers=1.1.1.1 1.0.0.1 2606:4700:4700::1111 2606:4700:4700::1001
Now save that file and restart your device. You should be able to ping it or connect with SSH from another device at the new static IP address. For example:
$ ping 192.168.2.5
PING 192.168.2.5 (192.168.2.5): 56 data bytes
64 bytes from 192.168.2.5: icmp_seq=0 ttl=64 time=0.343 ms
64 bytes from 192.168.2.5: icmp_seq=1 ttl=64 time=0.249 ms
64 bytes from 192.168.2.5: icmp_seq=2 ttl=64 time=0.219 ms
Installing Pi-hole 
Now on to the fun part! You can install Pi-hole with or without Docker. I prefer Docker since it helps keeps services like this isolated from each other, and it’s easy to replicate the exact same setup on different machines. I’ve included instructions for both methods.
Install Pi-hole With Docker 
First, if you haven’t already, you’ll need to install Docker.
Install Docker 
To start, we need to install some requirements for Docker:
sudo apt-get install apt-transport-https ca-certificates software-properties-common -yNext, we’ll install Docker from the official script provided:
curl -fsSL get.docker.com -o get-docker.sh && sh get-docker.shFinally, we’ll add our user account to the docker group, so we can use the docker command without prefixing it with sudo. You’ll need to log out and back in again after this step for it to take effect.
sudo usermod -aG docker piSetting up Docker With IPv6 Support 
Out of the box, Docker doesn’t support IPv6 networking so we’ll have to enable it. Start by editing (or creating) the Docker daemon configuration file at /etc/docker/daemon.json and add these options:
{
  "ipv6": true,
  "fixed-cidr-v6": "fd00::/80"
}
Warning
The official documentation doesn’t mention the fixed-cidr-v6 option but it doesn’t seem to work without this!
Then, restart the Docker daemon to apply the changes:
sudo systemctl restart dockerNext, we’ll setup an iptables route to make sure the docker network interface can receive IPv6 traffic:
sudo ip6tables -t nat -A POSTROUTING -s fd00::/80 ! -o docker0 -j MASQUERADEUnfortunately these routes won’t persist across reboots out of the box but that’s an easy fix:
sudo apt install iptables-persistent netfilter-persistentSaying yes to the default options when installing those will save your current routes and make sure they apply on boot.
At this point, you should test your connectivity to make sure IPv6 is working within Docker. An easy way to do that is to ping an IPv6 address with a small Docker container:
docker run --rm -t busybox ping6 -c 4 google.comSetup the Pi-hole Docker Container 
Pi-hole has a basic script to run a Docker container that we’ll modify to our needs:
wget https://github.com/pi-hole/docker-pi-hole/raw/master/docker_run.sh
nano docker_run.sh
In that file, you’ll first want to change the timezone environment variable (TZ="...") to be your timezone. You can find a list of timezone names here in the TZ database name column.
Next, edit the ServerIP variable to be the static IPv4 address of your device and add a line for the ServerIPv6 variable: (don’t forget the \ at the end!)
-e ServerIPv6="fd00:9050:df0c:f182:9ec4:ae37:1a0b:281b" \Overall, the docker run part of your script should look something like this:
docker run -d \
    --name pihole \
    -p 53:53/tcp -p 53:53/udp \
    -p 80:80 \
    -p 443:443 \
    -e TZ="America/Chicago" \
    -v "$(pwd)/etc-pihole/:/etc/pihole/" \
    -v "$(pwd)/etc-dnsmasq.d/:/etc/dnsmasq.d/" \
    --dns=127.0.0.1 --dns=1.1.1.1 \
    --restart=unless-stopped \
    --hostname pi.hole \
    -e VIRTUAL_HOST="pi.hole" \
    -e PROXY_LOCATION="pi.hole" \
    -e ServerIP="192.168.2.5" \
    -e ServerIPv6="fd00:9050:df0c:f182:9ec4:ae37:1a0b:281b" \
    pihole/pihole:latest
Running the Docker Container 
Now that we have the script configured we can run it! We’ll have make the script executable with chmod +x docker_run.sh and then we can run it with ./docker_run.sh. You should see some output like this to indicate it was successful:
Starting up pihole container .......... OK
Assigning random password: abcdef for your pi-hole: https://...
Take note of the password for the next step.
Installing Without Docker 
Installing Pi-hole without Docker is quite simply since they provide an automated installer script. Just download and run it with the following command and it will walk you through the whole process!
curl -sSL https://install.pi-hole.net | bashMake sure to take note of the admin password it generates for the next step.
Testing Pi-hole 
Once Pi-hole is installed and running, we can test it from another computer using the dig command. You’ll want to test both the IPv4 and IPv6 address and replace them with your own addresses in these commands:
$ dig @192.168.2.5 google.com
...
;; ANSWER SECTION:
google.com.        186    IN    A    172.217.164.206
...

$ dig -6 @fd00:9050:df0c:f182:9ec4:ae37:1a0b:281b google.com
...
;; ANSWER SECTION:
google.com. 186 IN A 172.217.164.206
...
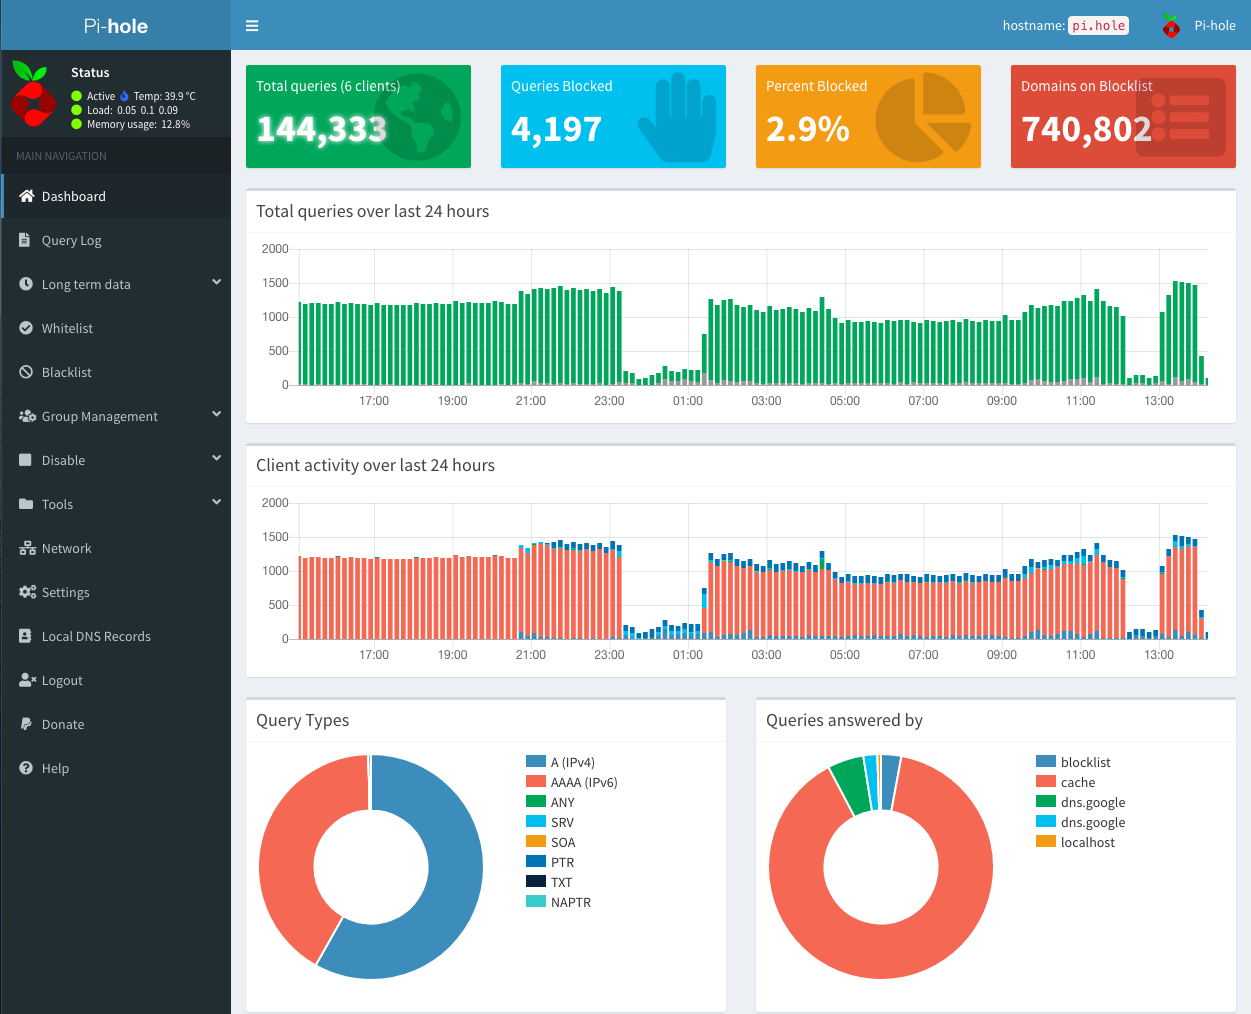
If you see output similar to mine that means Pi-hole is working and is accessible on your local network! Now you can also navigate to http://<pi-hole ip address>/admin in the browser, log in with the password it generated during installation, and check out the dashboard.
Using Pi-hole on Your Devices 
The easiest way to get all of your devices to use Pi-hole is to configure the DNS settings on your router to point to the IP addresses of your Pi-hole device. Most routers will let you change this, however some may have limitations such as not allowing local IP addresses or requiring at least 2 addresses to be entered. If your router requires at least 2 addresses to be entered, you can use one of your upstream DNS servers as the fallback (1.1.1.1 in my case).
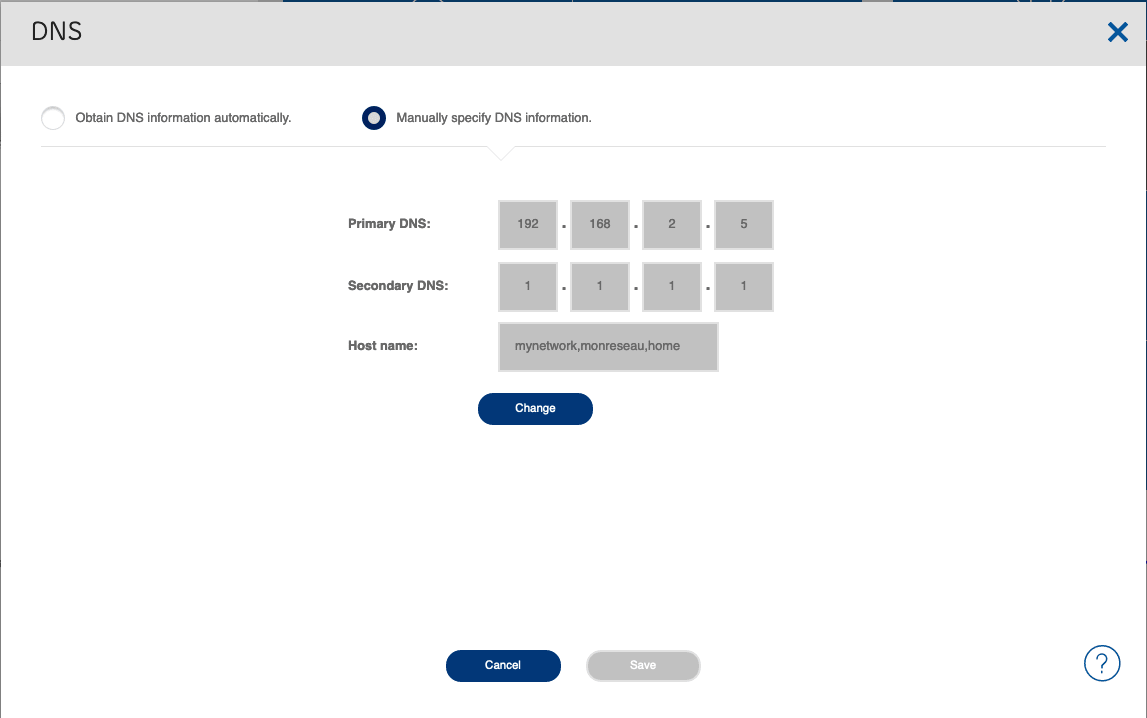
If you can’t change the DNS settings at all or your router doesn’t allow local IP addresses, you’ll either need to use Pi-hole as your DHCP server or manually set the DNS settings for each device on your network. Follow the instructions below for setting up the DHCP server, or search online for how to configure the DNS server of each of your devices.
Using Pi-hole as Your DHCP Server 
If you’re using Docker, you’ll have to change the setup script and recreate your container to give Pi-hole the necessary network permissions. If you’re not using docker, skip to the next step.
Configure Docker Networking for DHCP 
Instead of forwarding individual ports to the container, you’ll need to switch to host networking to allow Pi-hole to receive broadcasts from the network by removing the port lines (-p ...) and adding --net=host. You’ll also need to add the NET_ADMIN capability to let Pi-hole run a DHCP server with --cap-add=NET_ADMIN. So the docker run part of your script should look something like this now:
docker run -d \
    --name pihole \
    -p 53:53/tcp -p 53:53/udp \
    -p 80:80 \
    -p 443:443 \
    --net=host \
    --cap-add=NET_ADMIN \
    -e TZ="America/Chicago" \
    -v "$(pwd)/etc-pihole/:/etc/pihole/" \
    -v "$(pwd)/etc-dnsmasq.d/:/etc/dnsmasq.d/" \
    --dns=127.0.0.1 --dns=1.1.1.1 \
    --restart=unless-stopped \
    --hostname pi.hole \
    -e VIRTUAL_HOST="pi.hole" \
    -e PROXY_LOCATION="pi.hole" \
    -e ServerIP="192.168.2.5" \
    -e ServerIPv6="fd00:9050:df0c:f182:9ec4:ae37:1a0b:281b" \
    pihole/pihole:latest
Now you can recreate the docker container with the following commands:
docker stop pihole
docker rm pihole
./docker_run.sh
Enabling the DHCP Server 
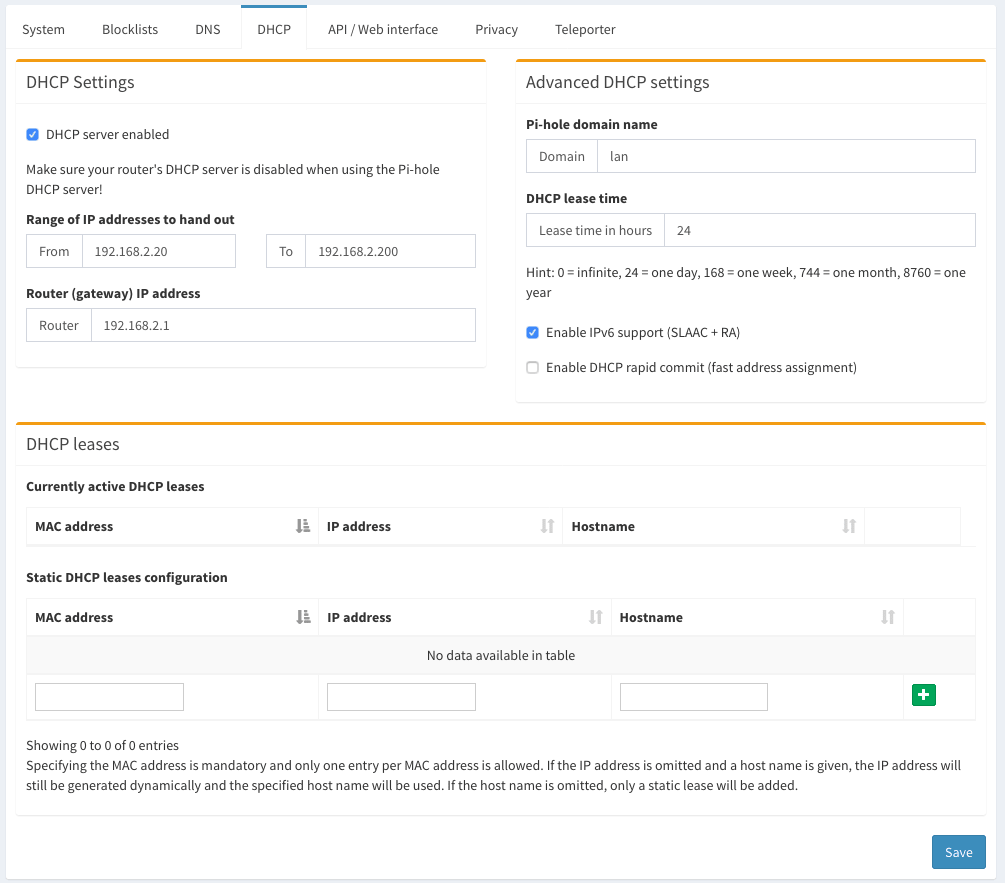
First, navigate to Settings → DHCP in the Pi-hole admin panel. Then, enable the DHCP server, fill in the range of IP addresses to hand out (using the same range as your existing router did), and enter your router’s IP address. If you want IPv6 support make sure to enable that. Next, save the settings and disable DHCP on your router.
Test the DHCP Server 
On a different device than you are currently using (so you don’t lose access to the router or Pi-hole), disconnect and reconnect to your network and make sure you still have internet access. Then, reload the Pi-hole DHCP settings page and you should see your device in the DHCP lease table.
Now that the DHCP server is working, as soon as you reconnect your device to your network they will all be using Pi-hole as their DNS server.
Next Steps 
Now that you have Pi-hole setup, you should start seeing fewer ads on your devices and some interesting stats on your dashboard about the queries that have been blocked. However, there are a few more things you may still want to do like adding more blocklists, unblocking certain domains, or setting up DNS over HTTPS for additional privacy.
Adding More Blocklists 
Pi-hole comes with a few blocklists out of the box, but there’s plenty more available online if you want to block as many ad and tracking servers as possible. There’s an excellent list at firebog.net, broken down by how likely they are to break common websites. If you want to stay on the safe side you can use only the ones with green checkmarks as they are least likely to break everyday browsing, or you can go all out and add whichever ones you’d like. Just be prepared to come back to Pi-hole to whitelist domains if something’s not working! I personally use all of the lists that do not have a strike through them.
To add these lists, first navigate to the Group Management → Adlists page. Then just copy and paste the address in and click Add.

Once you have all the lists you want, you have to update Pi-hole to use the new lists. You can do this by running pihole -g on your Pi-hole device (make sure to run docker exec -it pihole bash first if you’re using Docker to run it in the conainer) or from Tools → Update Gravity in the admin panel.
Unblocking Domains 
Depending on the blocklists you choose, it’s possible some services you regularly use will now be blocked. There’s a few suggested domains to unblock at the bottom of the firebog.net list, a discussion on the Pi-hole forum, and a set of scripts that will automatically add common domains to your instance.
Unblocking Individual Domains 
To unblock individual domains, navigate to the Whitelist page on the Pi-hole admin panel. Then you can either type in a domain or enter a regex pattern. If you want to unblock all subdomains of a domain, you can type in the top-level domain and check the wildcard box and Pi-hole will create a regex rule for you.

Figuring Out What To Unblock 
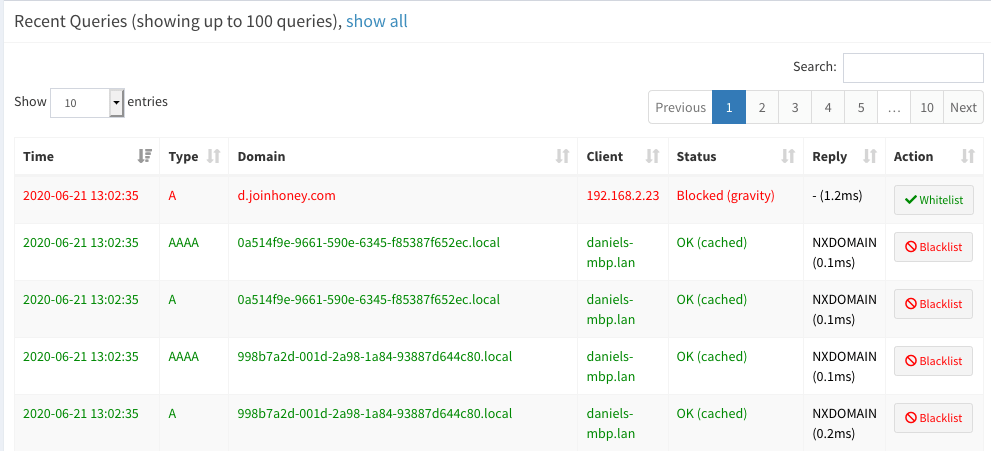
Depending on the website, you can often just unblock the whole domain and that will resolve the issue. However, some websites and apps use other domains that you may not be aware of. In that case, you can navigate to the Query Log in the Pi-hole admin panel and see recent domains that were blocked. There’s also a quick whitelist button right there to automatically unblock it.
Automatically Unblock Common Services 
To quickly unblock a lot of common domains we can run anudeepND’s whitelist script. If using Docker, make sure to execute the script in the container by running docker exec -it pihole bash first. It’s as easy as this:
git clone https://github.com/anudeepND/whitelist.git
cd whitelist/scripts
./whitelist.sh
Still Not Working? 
If it’s still not working after unblocking some domains or you just need to use this site/app once and can’t be bothered to figure out how to unblock it, you can also temporarily disable Pi-hole completely for a set period of time. Just click on Disable in the Pi-hole admin panel and choose a time, then Pi-hole will let everything through for however long you choose.

Using DNS over HTTPS (DoH) 
For better privacy, you can configure Pi-hole to use DNS over HTTPS when fetching DNS results from your upstream provider if it supports it. This way, unlike the regular DNS protocol, all queries from Pi-hole will be encrypted and your ISP will not be able to see them.
While Pi-hole can’t actually use DNS over HTTPS directly, it’s super easy to setup a proxy with Docker by running the following:
docker run --name cloudflared -d --net host --restart=unless-stopped visibilityspots/cloudflaredIf you’re not using Docker, you can also install cloudflared on your device and run it manually with the following:
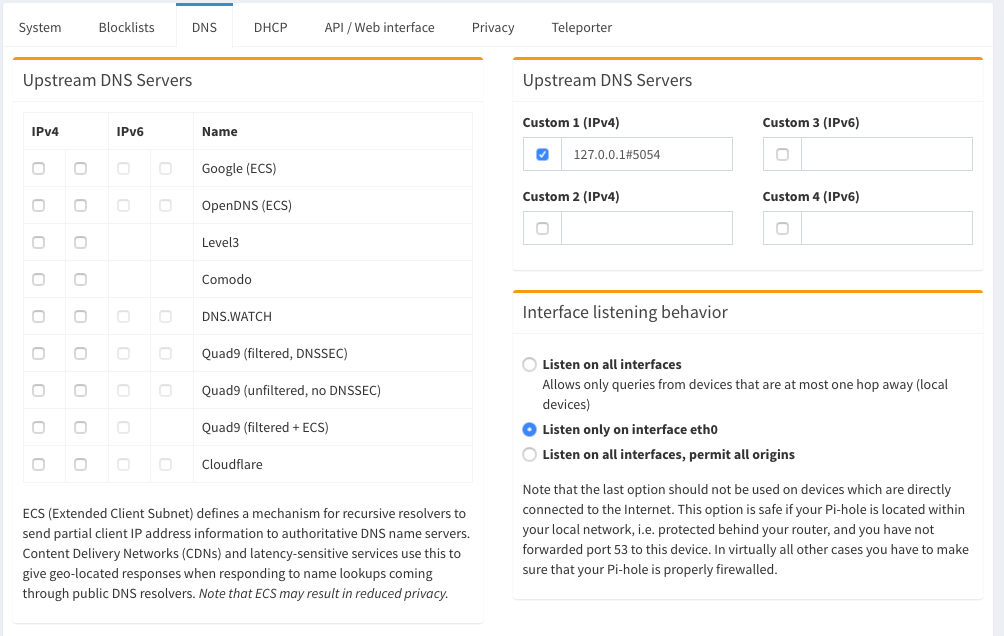
cloudflared proxy-dns --port 5054 --upstream https://1.1.1.1/.well-known/dns-query --upstream https://1.0.0.1/.well-known/dns-queryThis will run a DNS proxy on port 5054 that will communicate with Cloudflare’s 1.1.1.1 DNS over HTTPS. It can also be configured to work with other DoH providers. Then, you can navigate to Settings → DNS and configure Pi-hole to use this proxy by entering 127.0.0.1#5054 as a custom upstream DNS server.
